Add Visitor Labels & Alerts
Never miss an important visitor again. Visitor Labels and Alerts help you stay on top of visitor activity.
Visitor Labels
Visitor Labels enable you to add descriptive information about your visitors to help you track them as they visit, leave, and return to your site. You can use Labels to store notes, business names, customer IDs, and more. You can then filter your reports to only show traffic from an individual labeled visitor.
Add a Label
- While logged in to Statcounter, select one of your projects and navigate to any of the following Recent Activity reports: Visitor Activity, Visitor Paths or Page View Activity.
- Choose a visitor you'd like to label and click / tap on the Label icon to the right of the IP Address to open the Visitor Label & Alert popup.

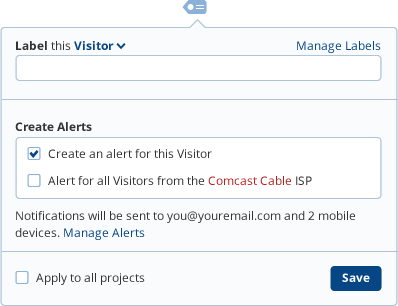
- In the Label this Visitor field, type the text you'd like to associate with this visitor, then click the Save button.

- The label icon will change to a darker blue and your label text will appear in bold to help you identify this visitor in your reports.

You can view and manage all of your Labels by selecting Manage Labels in the Visitor Label & Alert popup or by navigating to Visitor Labels in your project settings. You'll see a full list of all the Labels you've created, and you can update or delete them as you need to.
Visitor Alerts
Set alerts to be notified when an individual visitor returns to your website so you never have to miss an important visitor again.
Add an Alert
- While adding a Label to a visitor, you also have the option to add an alert and get notified the next time that visitor starts browsing your website. In the Visitor Label & Alert popup, check the box "Create an alert for this Visitor" and click Save.
You can also check the "Alert for all visitors from..." box if you want broader tracking for that visitor based on their ISP. This option could potentially generate a lot of alerts, so use it wisely!
- A bell icon
 will appear next to each visitor that you have set an alert for.
- To remove an alert, open the Visitor Label & Alert popup for that visitor, uncheck the alert checkbox and click Save.
Alert Notifications
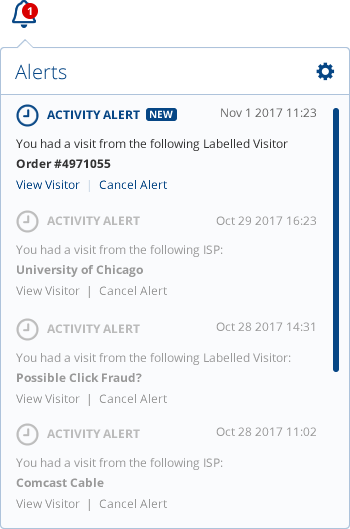
When a visitor you have set an alert for returns to your website, you'll receive a notification in Statcounter. The alert bell icon in the header of your project pages will show the number of new alerts in the red circle. Click the alert bell icon to open a dropdown list of all your alerts.
As new alerts are created, you will automatically receive an email notification. If you have installed the Statcounter app on any of your mobile devices, you'll receive a push notification.
Manage Alert Notifications
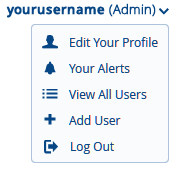
To manage your alert notifications, select Your Alerts from the user dropdown menu in the header. The Your Alerts page lets you switch on / off alerts for email or individual mobile devices.
Related Articles
- Install the mobile app and check your stats on the go.
- See the paths your visitors take through your website.
- Cut through the noise of your web traffic with Filters.
2 Comments